Okay, had my "Fun Fix" in the previous post. Now on to a few nagging details that need to be taken care of before going full bore at re-assembly. During the mock up phase I ran across 3 body/paint areas that needed attention. I won't go off on a tangent rant but I will state that I just don't get why someone would go to the extent of metal and body work that was done to this car and ignore some issues/details. Alright I feel better now :o)
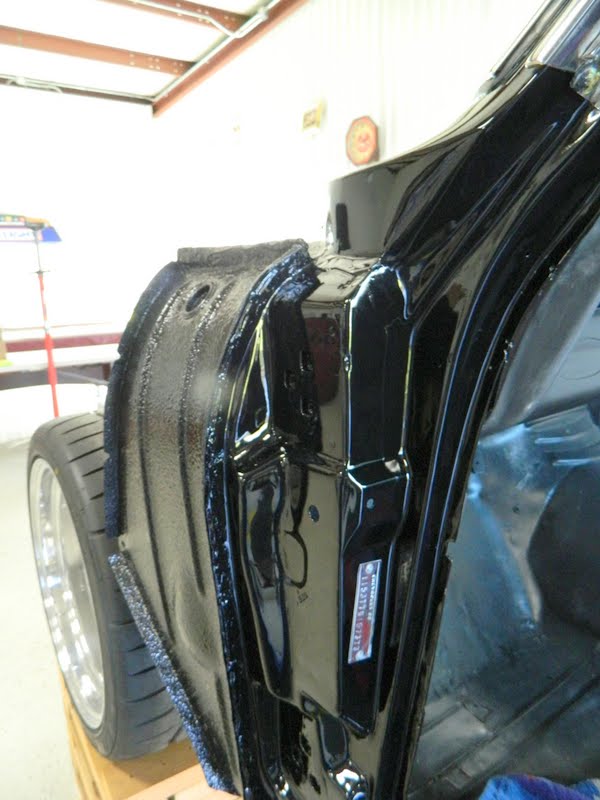
The first issue was in the drivers door jamb at the cowl. Before, I could open the door and lift it up quite a bit. My first thought was worn hinges (even though they were supposedly new). Once I had the door off the problem presented itself.... there is a lap joint where the outer/upper cowl attaches to the front door jamb. If you look closely you can see the crack running up the edge of the jamb from the lap joint. This is supposed to be a butt joint welded when replacing the outer cowl. I poked around the lap joint with a pick and found out that is was never welded, and obviously neither was the adjacent butt joint. The gouge near the top is where the door was hitting the cowl.

I dug out the seal seamer and body filler with a knife.

This is what I had. The lap joint was not attached nor was the butt joint. Looks like welding time...

I drilled holes for plug welds on the lap joint.


Plug welding.

Welding the butt joint. I decided to use a series of welds rather than completely welding the seam to keep the heat down. I don't want to have to repaint any more than I have to !


Ground welds and cleaned up the gouged area.

Applying a small amount of filler.

Sanded and ready for primer filler. You can see where I moved the tape further out to begin the blend to the existing painted surfaces.

Applying Z-Chrome (primer filler)


Wet sanded with 400 grit and applied seam sealer to the lap joint.
This is ready for paint. I will spray when I get the next area ready.

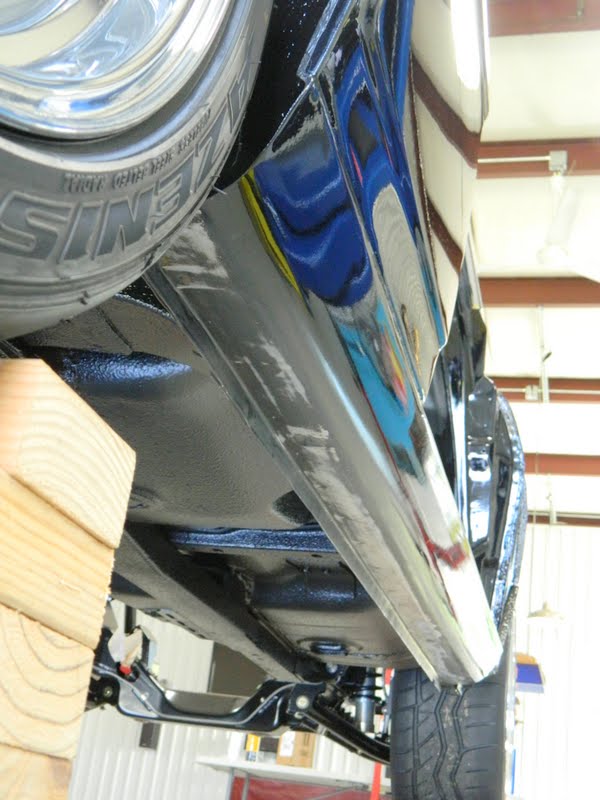
Rockers - This is what I was "not" ranting about earlier. There is no paint at all on the lower part of the rockers. The EDP coating that comes on replacement sheet metal will not offer any long term protection. To me this is part of the body and should be finished just as nice as the parts you can easily see. (I am the guy you see at car shows, cruise ins, etc. down on my knees checking out the running gear. It's a bummer if you see stuff like this).

So..... more sanding. I put the car on the blocks to get the lift arms out of the way.

Self etching primer. The tape on the rocker is rolled to keep from creating a sharp paint line.


Time for paint. I own plenty of paint equipment but I wanted to try out this product. These are true two part paints and require a respirator (Isocyanides). I have seen several ads and read the reviews. Looks promising. This is less expense than buying a quart of paint and activator and reducer. And a whole lot less clean up. Fortunately the paint on the car is non-metallic black, so matching the color was easy. I used the paint code for 2012 Chevy trucks/Corvettes. You pop the plunger on the bottom of the can to mix the activator with the paint. Pot life is 24 hrs.

Applying the base coat. The can sprays almost as nice as my $300 gun.


Applying the clear coat. Again, sprayed beautifully!


2nd coat of clear.


A little buffing the next morning and it blended nicely.


Not to shabby for a rattle can job !!!!


Rear bumper area. This is another area that never got any paint. So just a little scuff and painted with some Chassis Black.

This comment has been removed by the author.
ReplyDelete